$500 Off Cabinet Painting
TL;DR
If you’re looking for the best cleaner for vinyl siding, start with a cleaner that matches the type of dirt on your home instead of choosing the strongest chemical available. For general grime, a dedicated vinyl siding cleaner or mild soap solution is usually enough. For algae and mildew, an oxygen bleach cleaner is often the safest balance of cleaning power and surface protection. Chlorine bleach has its place but requires extra care around landscaping and painted surfaces.
| Category | Best Choice |
|---|---|
| Best Overall Cleaner | Simple Green Oxy Solve House and Siding Cleaner |
| Best Eco Friendly Cleaner | Simple Green House and Siding Cleaner |
| Best Mold Remover | Wet & Forget Outdoor |
| Best Budget Cleaner | Mild dish soap mixed with warm water |
| Safe for Plants? | Mild soap and oxygen bleach products are generally safer when used as directed and plants are rinsed before and after cleaning |
| Bleach Free? | Oxygen bleach cleaners and most biodegradable siding cleaners |
| Best for Heavy Mildew? | Professional grade oxygen bleach cleaner or carefully applied chlorine bleach solution when appropriate |
The best cleaner for vinyl siding depends on what you’re trying to remove. Dirt, pollen, algae, mold, mildew, oxidation and tree sap all respond differently to cleaning products. Choosing the right cleaner helps remove stains effectively while protecting the siding, landscaping and surrounding finishes.
Vinyl siding is one of the lowest maintenance exterior cladding materials available, but it is not maintenance free. Homes surrounded by trees, located in humid climates or exposed to heavy road dust often need more frequent cleaning than homeowners expect.
After years of cleaning residential exteriors, one pattern becomes clear: most siding damage comes from using the wrong cleaner or too much pressure, not from the dirt itself.
What Makes Vinyl Siding Dirty?
Several contaminants collect on siding throughout the year.
1. Dirt and Dust
Wind carries fine dust that sticks to textured vinyl surfaces, especially after rain.
2. Mold and Mildew
Moisture trapped on shaded walls creates ideal conditions for mildew growth. North facing walls are often affected first.
3. Algae
Green streaks usually appear where trees block sunlight or where humidity stays high.
4. Pollen
Spring pollen can coat entire homes with a yellow film that ordinary rain cannot remove.
5. Spider Webs and Insect Residue
Eaves, soffits and corners often accumulate webs and insect debris that trap additional dirt.
6. Tree Sap
Homes near pine or maple trees frequently develop sticky spots that attract dust.
7. Oxidation
Older vinyl siding gradually oxidizes from UV exposure. This chalky residue is different from dirt and requires gentle cleaning to avoid removing the surface finish.
Why Choosing the Right Cleaner Matters
Vinyl siding is durable, but not every cleaner is safe. Using the wrong product can:
- Fade color.
- Damage nearby plants.
- Leave streaks.
- Harm painted trim.
- Dry out rubber window seals.
- Corrode metal fixtures.
- Remove protective finishes.
Stronger is not always better. Many homeowners assume bleach solves every problem, but mild detergents often clean ordinary dirt just as well with much less risk.
Types of Vinyl Siding Cleaners
1. Store Bought Vinyl Siding Cleaners
Commercial cleaners are formulated specifically for exterior surfaces.
Formulated with:
- Surfactants.
- Oxygen bleach.
- Biodegradable detergents.
- Mold inhibitors.
- Water softeners.
Advantages include:
- Consistent performance.
- Easier mixing.
- Better rinsing.
- Lower chance of surface damage.
Disadvantages include:
- Higher cost.
- Some require garden hose applicators.
- Performance varies depending on stain type.
2. Homemade Cleaning Solutions
Homemade cleaners work well for light maintenance. Popular options include:
- Warm water + dish soap: General dirt
- White vinegar + water: Light mildew
- Baking soda paste: Small stubborn stains
- Oxygen bleach solution: Organic growth
Avoid mixing household chemicals together unless the manufacturer specifically states they are compatible.
3. Oxygen Bleach vs. Chlorine Bleach
Many homeowners confuse these products, but they work differently.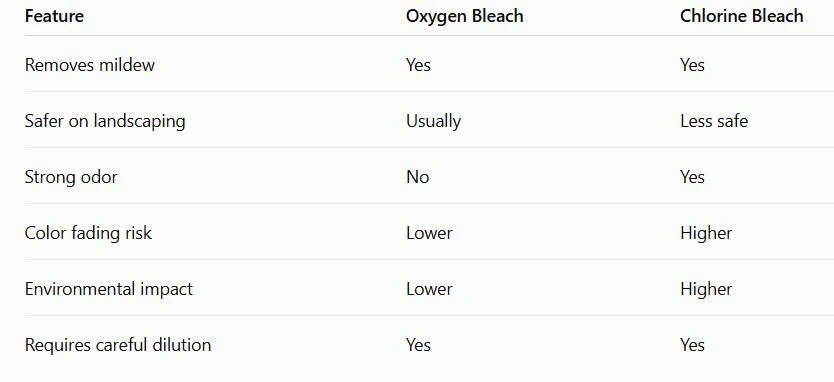
Oxygen Bleach
Oxygen bleach releases oxygen instead of chlorine.
Benefits include:
- Less harsh on siding.
- Better for surrounding plants.
- No strong bleach smell.
- Good for routine maintenance.
Chlorine Bleach
Chlorine bleach removes heavy biological growth quickly but requires caution.
Always:
- Wear eye protection.
- Wear gloves.
- Wet nearby plants first.
- Rinse landscaping afterward.
- Never mix with ammonia or acidic cleaners.
Book Free estimate now!
Schedule a free estimate with our experts at Trucoat Painting Plus to gain insights on your cabinet painting project.
Best Vinyl Siding Cleaners Compared
1. Simple Green Oxy Solve House and Siding Cleaner
Best Overall
Pros
- Removes dirt and mildew.
- Oxygen powered formula.
- No chlorine bleach.
- Works with pressure washer attachments.
Cons
- Heavy stains may require two applications.
Best for: Routine cleaning on most homes.
2. Wet & Forget Outdoor
Best Mold Remover
Pros
- Excellent on algae.
- Good for mildew.
- Minimal scrubbing.
Cons
- Results develop gradually.
Best for: Homes with recurring biological growth.
3. Simple Green House and Siding Cleaner
Best Eco Friendly Option
Pros
- Biodegradable.
- Low odor.
- Safe on many exterior surfaces when used according to directions.
Cons
- May require brushing on stubborn stains.
4. Mild Dish Soap
Best Budget Cleaner
Pros
- Inexpensive.
- Readily available.
- Effective for dust and pollen.
Cons
- Not ideal for heavy mildew.
5. Oxygen Bleach Powder
Best for Deep Cleaning
Pros
- Excellent stain removal.
- Less harsh than chlorine bleach.
- Good on organic staining.
Cons
- Requires mixing.
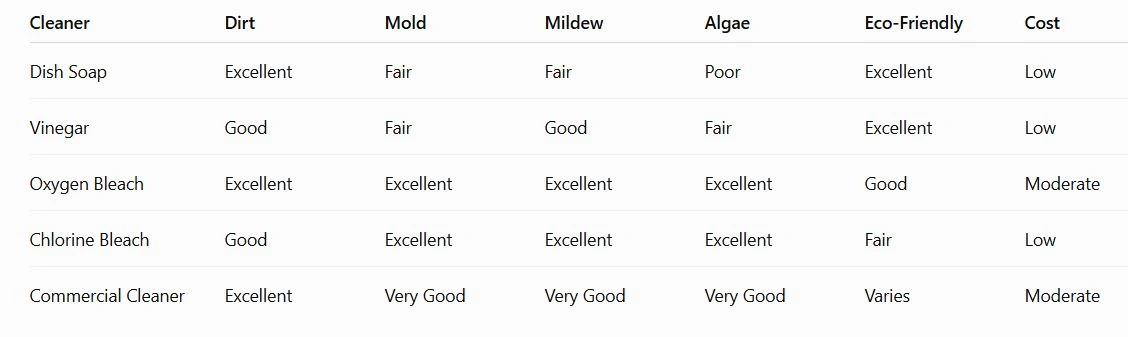
Cleaner Comparison Table
Book Free estimate now!
Schedule a free estimate with our experts at Trucoat Painting Plus to gain insights on your cabinet painting project.
How to Clean Vinyl Siding Properly
Step 1
Inspect the siding. Look for:
- Cracks.
- Loose panels.
- Open seams.
- Damaged caulk.
Cleaning before repairs may force water behind the siding.
Step 2
Protect surrounding plants. Rinse shrubs and flowers with water before applying cleaner.
Step 3
Work in manageable sections. Cleaning one wall at a time helps prevent streaking.
Step 4
Apply cleaner from the bottom upward. Starting low reduces streaks caused by cleaner running down dry siding.
Step 5
Allow the cleaner to dwell. Follow the manufacturer’s recommended dwell time. Do not let the cleaner dry completely on the surface.
Step 6
Use a soft bristle brush if needed. Avoid: Wire brushes. Abrasive pads. Metal scrapers.
Step 7
Rinse thoroughly. Rinse from the top down using plenty of clean water.
Common Cleaning Mistakes
Many siding problems are preventable. Avoid these mistakes:
- Using excessive pressure.
- Spraying upward beneath siding panels.
- Cleaning in direct sunlight.
- Letting cleaner dry on the surface.
- Ignoring manufacturer dilution ratios.
- Using abrasive brushes.
- Mixing chemicals.
- Skipping plant protection.
When Pressure Washing Is Safe
Pressure washing can be effective when performed correctly. It generally works well if:
- Pressure stays relatively low.
- A wide spray tip is used.
- The nozzle remains several feet from the siding.
- Water is directed downward.
Soft washing often produces better long term results on homes with mildew.
When Pressure Washing Isn’t Recommended
Avoid pressure washing if:
- Siding is cracked.
- Panels are loose.
- Caulk has failed.
- Water can enter behind the siding.
- Older siding has become brittle.
High pressure may force water behind the cladding, increasing the risk of hidden moisture problems.
How Often Should Vinyl Siding Be Cleaned?
Cleaning frequency depends on climate and surroundings.
- Dry climate: Every 2 to 3 years.
- Average suburban neighborhood: Every 12 to 24 months.
- Humid climate: Annually.
- Heavy tree coverage: Annually or as needed.
- Near busy roads: Every 12 months.
Homes with persistent mildew may benefit from seasonal spot cleaning.
Book Free estimate now!
Schedule a free estimate with our experts at Trucoat Painting Plus to gain insights on your cabinet painting project.
DIY Cleaning vs. Hiring Professionals
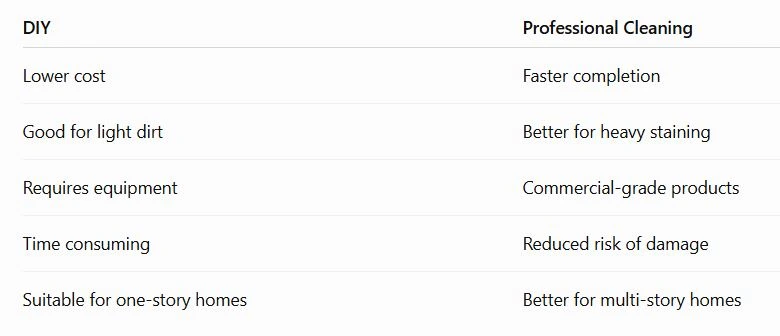
DIY works well when:
- Dirt is light.
- You can safely reach the siding.
- No heavy mildew is present.
Professional cleaning is often worth considering when:
- The home is multiple stories.
- Stains keep returning.
- Oxidation is present.
- Landscaping is extensive.
- Safety is a concern.
Typical Cost Comparison
- DIY soap solution: $10 to $30
- Commercial cleaner: $20 to $60
- Oxygen bleach products: $25 to $60
- Professional house washing: Varies by home size, condition, accessibility and local market.
A larger home with significant mildew typically costs more to clean than a smaller home with light surface dirt.
Environmental Considerations
Cleaning products eventually reach soil and stormwater systems. To reduce environmental impact:
- Choose biodegradable products when practical.
- Follow mixing directions carefully.
- Avoid excessive chemical use.
- Prevent runoff into ponds or streams.
- Rinse plants before and after cleaning.
- Dispose of leftover solutions according to product instructions.
Small changes can significantly reduce unnecessary chemical exposure.
Maintenance Tips That Keep Vinyl Siding Cleaner Longer
Routine maintenance extends the time between major cleanings. Helpful practices include:
- Trim shrubs away from walls.
- Keep gutters clean to prevent overflow.
- Repair leaking downspouts.
- Remove cobwebs regularly.
- Wash pollen off each spring.
- Improve airflow around shaded walls.
- Inspect caulking every year.
Keeping moisture under control often prevents mildew before it starts.
Book Free estimate now!
Schedule a free estimate with our experts at Trucoat Painting Plus to gain insights on your cabinet painting project.
Expert Contractor Recommendations
After cleaning thousands of square feet of vinyl siding over the years, several practices consistently produce the best results:
- Match the cleaner to the stain instead of relying on the strongest product.
- Test any cleaner on a small, inconspicuous area first.
- Clean on cool, overcast days when possible.
- Use soft washing techniques before increasing pressure.
- Rinse thoroughly to prevent residue.
- Address drainage or moisture issues if algae keeps returning, since cleaning alone will not solve the underlying cause.
- Replace damaged siding panels before washing if water can enter behind them.
- Read the siding manufacturer’s care instructions, as some products have specific recommendations or restrictions.
Conclusion
Choosing the best cleaner for vinyl siding comes down to understanding the stain, selecting an appropriate cleaning product and using safe techniques that protect both the siding and your landscaping. Mild soap handles everyday dirt, oxygen bleach works well for mildew and algae and stronger cleaners should be reserved for situations where they’re truly needed.
Regular maintenance is easier, safer and usually less expensive than waiting until heavy staining develops. For homeowners who encounter persistent mildew, difficult access or aging siding, seeking guidance from experienced professionals such as Trucoat Painting Plus can help determine the safest cleaning approach before more extensive work becomes necessary.