$500 Off Cabinet Painting
An exterior door can be painted successfully with the right preparation, primer and exterior grade paint. However, how to paint exterior door depends partly on its material. Wood, metal and fiberglass doors have different surface requirements and using the wrong preparation method or paint can lead to peeling, poor adhesion, visible brush marks or premature paint failure.
The key is to identify the door material, check its existing finish, prepare the surface properly and choose products that are compatible with the door and its manufacturer’s recommendations. Weather conditions and drying time also matter because an exterior door must eventually close against its frame without sticking or damaging the fresh coating.
TL;DR
- Wood doors: Clean, scrape loose paint, sand rough areas, repair minor imperfections and prime bare wood with a compatible exterior primer.
- Metal doors: Remove dirt and rust, address corrosion and use a primer specifically compatible with the metal and existing coating.
- Fiberglass doors: Clean thoroughly and use a compatible bonding primer only when the door manufacturer or paint system calls for one.
- Paint selection: Choose a quality exterior rated coating compatible with the door material and existing finish.
- Preparation: Remove or protect hardware, address damaged weatherstripping and make sure the surface is dry before painting.
- Application: Use a quality brush for edges and details and an appropriate mini roller or brush for larger flat areas.
- Weather: Avoid painting in direct, intense sunlight, rain, heavy humidity or temperatures outside the paint manufacturer’s recommended range.
- Drying: Follow the product’s stated drying and recoating times. Dry to the touch does not necessarily mean ready for closing.
How to Identify Your Exterior Door Material Before Painting
Before buying paint or sandpaper, determine what your door is made of. The material affects how you clean, sand, prime and apply the finish.
1. Wood exterior doors
Wood doors may have a painted, stained or factory primed surface. They can absorb moisture, swell and develop cracks or peeling paint when their protective finish deteriorates. Bare wood generally needs a compatible exterior primer before painting.
2. Metal exterior doors
Many residential metal doors have steel skins with a factory applied primer or finish. Their main preparation concerns include removing grease, addressing rust and selecting a primer that adheres to the existing coating or exposed metal.
3. Fiberglass exterior doors
Fiberglass doors may have smooth or molded wood grain surfaces. Their factory finishes differ by manufacturer and product line. Some models can be painted after cleaning without a separate primer, while others require priming. Heavy sanding can damage the molded texture.
A door’s appearance alone does not always reveal its construction. Check the manufacturer’s label, installation paperwork or product documentation when possible. This is especially important for fiberglass doors with specialized factory finishes.
Tools and Materials Needed to Paint an Exterior Door
Having everything ready before starting makes the job easier and reduces the chance of leaving the door partially coated while looking for supplies.
Basic tools
- Angled paintbrush, approximately 2 to 2½ inches wide.
- Small foam or microfiber roller, if compatible with the selected paint.
- Paint tray and liners.
- Sandpaper in suitable grits, such as 120, 150 and 220.
- Sanding sponge for profiles and corners.
- Scraper for loose, failing paint.
- Clean microfiber cloth.
- Mild detergent and clean water.
- Painter’s tape and protective drop cloths.
- Screwdriver for removing hardware.
- Safety glasses, gloves and suitable respiratory protection when required.
Materials
- Exterior rated door and trim paint.
- Compatible exterior primer, if needed.
- Suitable wood filler or metal repair product, depending on the surface.
- Rust treatment or corrosion control primer when required for steel.
- Paintable exterior sealant for suitable joints, if necessary.
You do not necessarily need every item on this list. The condition and construction of the door determine which products are necessary.
How to Choose the Right Exterior Door Paint
Exterior doors experience more than ordinary indoor wear. They are exposed to sunlight, rain, temperature changes, fingerprints and repeated contact with weatherstripping.
Choose paint labeled for exterior use and suitable for the door’s material. An exterior acrylic latex paint is a common option for many wood and fiberglass doors. Some metal doors also accept acrylic coatings, provided the primer and existing finish are compatible.
Acrylic latex vs. oil based paint
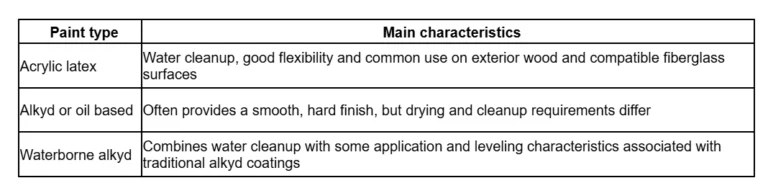
There is no universal winner. The existing coating, door material, exposure and manufacturer’s recommendations matter more than choosing a paint based on its category alone.
Which paint sheen works best?
Common choices include:
- Satin: A relatively subtle sheen that does not emphasize every small surface imperfection.
- Semi gloss: Reflects more light and is a popular choice for entry doors because it is relatively easy to clean.
- Gloss: Produces a more reflective finish but makes dents, sanding marks and uneven application easier to notice.
The sheen should also work with the door’s existing condition. A heavily worn wood door may show surface defects more clearly under gloss paint.
Choosing a color
Consider the home’s siding, brick, stone, trim, roof and surrounding landscape. A contrasting door color can make the entrance more noticeable, while a complementary color creates a quieter appearance.
Sun exposure matters, too. Dark colors can become significantly hotter in direct sunlight, which may be a concern for some fiberglass doors. Check the door manufacturer’s restrictions on dark paint colors before choosing one.
A color consultant can help homeowners compare colors against the home’s fixed exterior materials. Trucoat Painting Plus offers color consultants for homeowners who want assistance evaluating their color choices.
How to Paint Exterior Door: Step by Step
The following process covers a typical repainting project. Adjust the preparation and primer steps according to the door material and the paint manufacturer’s instructions.
Step 1: Choose the Right Weather Conditions
Check the weather forecast before beginning. Painting an exterior door requires suitable conditions not only during application but also throughout the initial drying period. Pay attention to:
- Air temperature.
- Surface temperature of the door.
- Relative humidity.
- Rain and expected moisture exposure.
- Direct sunlight.
- Overnight temperature changes.
Many exterior paints specify an application range around 50°F to 90°F, but some products allow lower temperatures. Never assume a coating is suitable simply because the air feels comfortable.
Avoid painting a door that is hot from direct sunlight. Excessive heat can cause paint to dry too quickly, making it harder to maintain a smooth finish. High humidity and low temperatures can extend drying times. Read the paint label and technical data sheet for the actual application limits.
Step 2: Remove Hardware and Protect the Surrounding Area
Remove the doorknob, deadbolt trim, kick plate, door knocker and other removable hardware when practical. Removing hardware produces cleaner paint lines and prevents paint from collecting around handles and locks.
If removing a component is difficult, cover it carefully with painter’s tape. Protect glass panels with masking material, taking care not to damage glazing or existing sealant. Also protect the floor, threshold, nearby walls and surrounding trim. Inspect the weatherstripping around the frame. Some compression seals can be gently pulled from their grooves and reinstalled after painting. Others should remain in place. Follow the door manufacturer’s instructions.
Do not paint rubber seals, door sweeps or other flexible sealing components unless the manufacturer specifically permits it.
Step 3: Clean the Door Thoroughly
Paint will not adhere reliably to a surface covered with dirt, grease, pollen or other contaminants. Wash the door with mild detergent and water, using a soft cloth or sponge. Pay particular attention to areas around the handle, lower panels and edges.
If the door has stubborn contamination, use a cleaner recommended by the existing coating or door manufacturer. Rinse away cleaning residue when required and allow the door to dry completely. Do not apply primer or paint over a damp surface. Moisture trapped beneath the coating can contribute to adhesion problems and premature failure.
Step 4: Inspect the Surface and Remove Loose Paint
Examine the entire door for:
- Peeling or blistering paint.
- Cracked or damaged areas.
- Rust spots on steel doors.
- Exposed wood or bare metal.
- Loose joints or damaged panels.
- Previous repairs that have failed.
Scrape away paint that is already loose or flaking. Avoid aggressively removing sound, firmly attached paint simply because you are repainting.
If the existing coating is glossy, a light scuff sanding may help the next coating adhere, provided the manufacturer’s instructions allow it.
Important lead paint precaution: If your home was built before 1978, older door coatings may contain lead. Scraping and sanding can release hazardous dust. Do not begin ordinary dry sanding until you have assessed the lead risk. The EPA recommends lead safe work practices and certified contractors for covered renovation work that disturbs lead based paint.
Step 5: Sand the Door Without Damaging Its Surface
Sanding removes rough edges, smooths repairs and helps prepare an existing coating for repainting. For previously painted wood or metal doors with sound coatings, use a suitable fine or medium abrasive to smooth imperfections and dull glossy areas. The exact grit depends on the coating condition and manufacturer’s recommendations.
For wood doors
- Sand rough areas in the direction of wood grain.
- Feather the edges of remaining paint around scraped areas.
- Smooth repaired sections after the filler has dried.
- Remove all sanding dust before priming.
For metal doors
- Scuff the existing sound finish to improve adhesion when permitted.
- Remove corrosion using a suitable method.
- Avoid sanding through the factory coating unnecessarily.
For fiberglass doors
- Avoid aggressive sanding.
- Do not use coarse abrasives on molded wood grain patterns.
- Follow the manufacturer’s instructions for preparing the specific door finish.
Fiberglass is particularly easy to damage through excessive sanding because its decorative surface may be molded rather than actual wood grain.
Book Free estimate now!
Schedule a free estimate with our experts at Trucoat Painting Plus to gain insights on your cabinet painting project.
Step 6: Repair Surface Damage and Apply Primer
Primer is not automatically required on every exterior door. Its purpose is to prepare specific surfaces for the finish coat.
Wood doors: Bare wood, exposed repairs and certain existing finishes generally need a compatible exterior primer. A quality wood primer helps seal porous areas and promotes uniform paint coverage.
Metal doors: Bare steel requires a primer specifically formulated for the exposed metal. If rust is present, remove loose corrosion and use a compatible rust inhibiting system. Do not apply ordinary wood primer over exposed steel unless the product is approved for that use.
Fiberglass doors: Follow the door manufacturer’s finishing instructions. For example, Therma Tru specifies different requirements for its Smooth Star and wood grained fiberglass product lines. Some Smooth Star doors do not require primer, while its Classic Craft and Fiber Classic painted doors call for priming before the finish coat.
Apply primer evenly without allowing it to collect in recessed panels, corners or decorative grooves. Let it dry for the period specified on the product label. Once dry, lightly sand primer only if the product instructions call for it, then remove the dust.
Step 7: Apply the First Coat of Exterior Paint
Stir the paint thoroughly before application. If you are using multiple cans of the same color, combining them in a larger container can help maintain consistent color across the door. For a traditional paneled door, a practical brush sequence is:
- Paint recessed panels and their molded edges first.
- Paint the vertical stiles.
- Paint the horizontal rails.
- Finish any remaining flat sections and exposed edges.
Work systematically and avoid applying excessive paint to corners or panel grooves. Use an angled brush for detailed areas and a small roller for larger, flat sections if the paint and surface allow it. After rolling, lightly brush out any unwanted roller texture if necessary.
For a flat slab door, use long, controlled strokes and maintain a wet edge. This means overlapping the next stroke while the previous paint is still wet, reducing visible lap marks. Apply a consistent film rather than trying to achieve full color coverage in one heavy coat.
Step 8: Apply a Second Coat
Allow the first coat to dry according to the paint manufacturer’s recoat instructions. The correct waiting period varies by product. Some waterborne door paints permit recoating after approximately four hours under standard conditions, while other exterior paints recommend considerably longer intervals.
For instance, Benjamin Moore’s front door painting guidance recommends waiting at least 24 hours between coats for its suggested process. This is not a universal requirement for every paint. Before applying the second coat:
- Check that the first coat is dry enough for recoating.
- Look for missed areas and uneven coverage.
- Remove any dust or contamination.
- Lightly smooth imperfections if the product instructions permit it.
Apply the second coat using the same method as the first. Two coats are common for repainting projects, but the number required depends on the product, color change, surface condition and coverage.
Step 9: Reinstall Hardware and Check the Door
Wait until the coating is sufficiently dry before reinstalling handles, locks and other hardware. Be careful when tightening screws. Tools can scratch or dent a fresh finish.
Check the door edges, especially the top, bottom and latch side. Exterior door manufacturers may require all exposed surfaces to be finished to help limit moisture entry.
However, door sweeps and weatherstripping are not ordinary paintable surfaces. Follow the manufacturer’s instructions rather than coating flexible seals. Do not force the door closed against tacky paint. Fresh paint can transfer to the frame, stick to weatherstripping or tear when the door is opened.
If the door must remain closed for security, plan the work around the coating’s drying requirements and the door manufacturer’s guidance. Remove weatherstripping only when it is designed to be removed and reinstall it after the finish has dried sufficiently.